In essence there are two basic principles by which orthopaedic hip implants are secured to the bone, ‘cemented’ and ‘uncemented’.
Cemented fixation
Traditionally, acrylic bone cement is used, functionally as a grout, to fix either the acetabular or femoral component, or both, into the patient’s bone. In the acetabulum, this involves “squeezing” or ‘pressurising’ an acrylic bone cement into the bone, within the socket, then positioning a polyethylene acetabular bearing surface into the pelvis, holding the component in the desired position firmly with pressure as the cement sets. This typically takes around ten minutes. This then establishes fixation of a cemented socket into the pelvis, ideally in perfect alignment.
On the femoral side a similar technique is utilised. A ‘restrictor’ device is positioned part- way down the femoral canal to prevent the cement from going ‘all the way’ down into the bone. Doughy cement is then injected into the femur, from the top, and then pressurised to ensure that the cement locks soundly into the bone itself. A metal stem, carefully selected in terms of size to optimise hip biomechanics after surgery, is then pushed down into this bone cement and maintained in perfect position until the cement has hardened. Thus the fixation of a cemented implant is strong immediately after surgery. This allows the patient to mobilise rapidly, typically putting full weight on to the implant unless there are other complexities that would guard against this. (This is discussed further in the rehabilitation component on the website.)
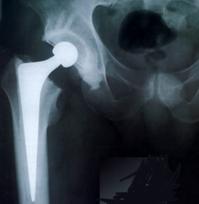
The above x-ray shows an example of a cemented hip replacement. Cement has been pressurised into the bone, obtaining sound and solid fixation of the components within the bone, with the implants perfectly positioned. The surgeon is then able to ‘balance’ the hip in terms of soft tissue tension to ensure the best possible functional outcome.
Uncemented fixation
The alternative to cement is to use ‘uncemented’ fixation.
On the acetabular side, the theoretical benefits of ‘uncemented’ fixation are that this allows the surgeon to use different, potentially more ‘hard’, bearing options such as a ceramic liner, with the chosen ‘liner option’ locked into the uncemented shell. Various different liner options exist. They vary in terms of material, design, head size and degree of ‘captivity’ or ‘containment’ of the femoral head component.
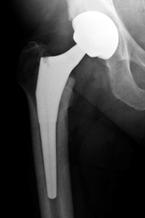
An uncemented acetabular component is demonstrated in this x-ray.
‘Uncemented’ acetabular implants have either surface coatings or a surface finish that facilitates the bone to grow into (‘ingrowth’) or on to (‘ongrowth’) the component. This secures the implant in position. Frequently a titanium screw is used at the time of surgery to stabilise the component while that ingrowth process occurs. Theoretically this produces a more physiological and dynamic mechanism by which the implant fixes to the bone.
‘Uncemented’ fixation is used more commonly in patients with more solid bone, allowing the surgeon to use a more hard bearing surface option while also theoretically giving a sound and dynamic bond between the component and the bony skeleton.
On the femoral side, ‘uncemented’ fixation again depends on the surface geometry of the stem. Typically, there is a rough surface with an associated coating around the stem that encourages and facilitates the bone to grow ‘onto’ or ‘into’ the component. This results in solid fixation into the patient’s bone. Typically, again, ‘uncemented’ fixation has been used in ‘young bone’ but also in patients with particularly ‘strong’ femoral bone stock, often with a certain shape (a so-called proximal ‘champagne flute’ shape) that can lend itself better to ‘uncemented’ rather than ‘cemented’ fixation.
There are a number of uncemented stems available with different fixation characteristics and designs. In some circumstances the surgeon may wish to achieve fixation circumferentially around the implant. In other circumstances it may well be felt to be beneficial to achieve fixation only proximally, keeping the stem ‘smooth’ distally, to facilitate bone preservation within the femur should revision surgery be likely to be required over the patient’s lifetime.
It has always been a fundamental concept in my practice to work to ensure that any component I implant at the time of an index primary hip procedure should be relatively ‘revisable’, ideally to another ‘primary-type’ component. My desire to maintain bone stock for the future is fundamental to my practice in primary hip surgery.
Of note, there are different ‘uncemented’ and indeed ‘cemented’ options and designs on both the femoral and acetabular side available in the circumstances of more complex primary and revision.
A surgeon who carries out a large number of these procedures should, in my opinion, have all of the options and techniques available to ensure the best technique is chosen in any particular patient’s circumstance.
It is difficult to compare the results of different fixation options on the acetabular or indeed femoral side without considering the bearing surface. As detailed elsewhere, it is typically the bearing surface that ‘wears’ in a hip replacement and it is frequently the wear products themselves, via a biological response to the foreign material, that can result in loosening of the implants. Clearly, therefore, it is essential that different bearing surfaces are considered when one looks at the overall results of implant fixation.